2.5 - Materials & material switches
Materials
Materials exist on every element in your model and are stored at the Library level. Materials (and their properties)
define the visual appearance of your model and can only be edited inside the Configurable Editor. Materials are shared across all models within a Library. That means if you change properties on a material like beton_prefab, those changes are visible on every model that uses that material somewhere.
But how do you know which material is on which part of your model? There is a handy trick: inside the Configurable Editor use the i hotkey to activate the Material Picker . Click an element of your model (e.g., roof or wall) to instantly show the correct material.
Use the Material Picker i to select the top of the roof. Play with a few properties to get a feel for how they influence the model.
Every material can have a texture. For the roof we want a nice dark roof tile. On our Downloads page you can download a texture set that includes a range of roof tiles. In Innobrix you can upload and use textures by dragging them from a folder on your computer into the Textures panel of the Content Browser. You can drag multiple at once; no need to do them one by one.
Drag a roof tile texture of your choice from your texture folder into the Textures panel in Innobrix.
The uploaded textures appear and are ready to use.
-
If the roof-tile material you selected in the previous step is no longer selected, repeat STEP 11.
-
If needed, scroll the roof-tile material properties down until you see the square
Textureslot. -
Drag the roof-tile texture from the
Texturespanel onto theTextureslot in the material properties to assign it to the roof-tile material.
The repeating roof-tile texture should now be visible on the model.
To see the visual result more easily, it often helps to view the model in collapsed form instead of grid (exploded) view.
Material switches
Beyond using textures to enrich your model visually, Innobrix also lets you create "material switches". As the name suggests, material switches allow you to swap materials on elements in a model based on an option.
Material switches are a powerful feature because they affect the entire look and feel of a home. You need three things for a material switch:
-
A source material: the material currently on the element(s) you want to replace
-
A target material: the material that should replace the source material on the element
-
An option: the option that triggers the switch
Target materials can come from Revit, but you can also create them yourself by uploading textures directly to the Materials panel instead of the Textures panel.
For this step you need three options that we will use in a material switch.
- Create the following options under a new category "Exterieur" with the header "Metselwerk":
-
Storvik
-
Dragor
-
Hadsund
Set the property type to Thumbnail for all three options.
- After setting the type to
Thumbnail, aThumbnailfield appears in the option properties. Here you can add a custom thumbnail. Click the empty field and upload an image for each of the three options.
You have several ways to create the actual switches:
-
Right-click RMB on the "Material switches" label/icon in the scene hierarchy and choose
+ New material switch. -
Drag a material from the
Materialspanel in theContent Browseronto the "Material switches" label/icon. This creates a new switch with the source material prefilled. -
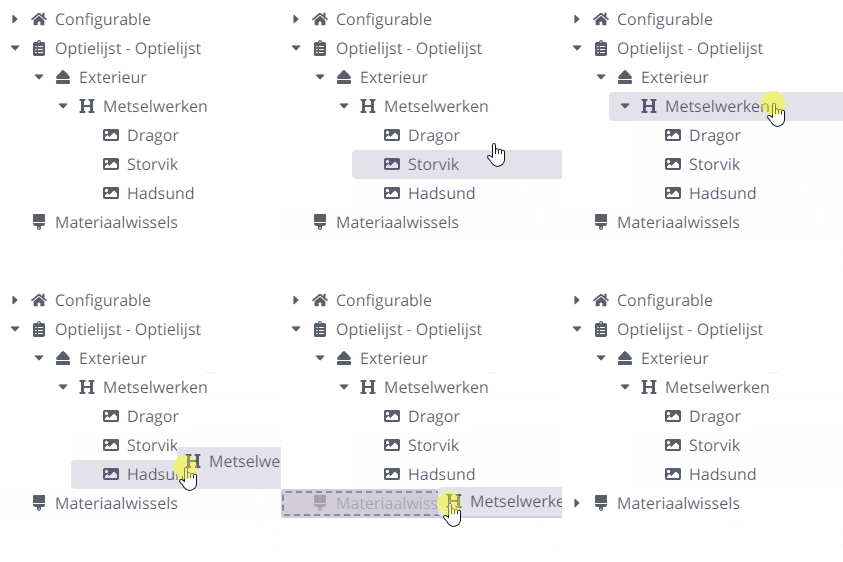
Drag an option or header onto the "Material switches" label/icon. This creates a switch with the option(s) already linked; you only need to define the source and target materials.

-
Drag the header "Metselwerk" onto "Material switches".
-
Click "Material switches" (now expandable) and then click the ... icon that appeared.
Creating target materials
The ... in the switch indicate something is missing. You still need to define a base material and target materials. We already have the base material; the target materials still need to be created.

Create the new materials Storvik, Dragor, and Hadsund by dragging the corresponding textures (with those names) from your folder into the Materials panel.
The last step is to link the source and target materials to the appropriate fields in the new switch.
-
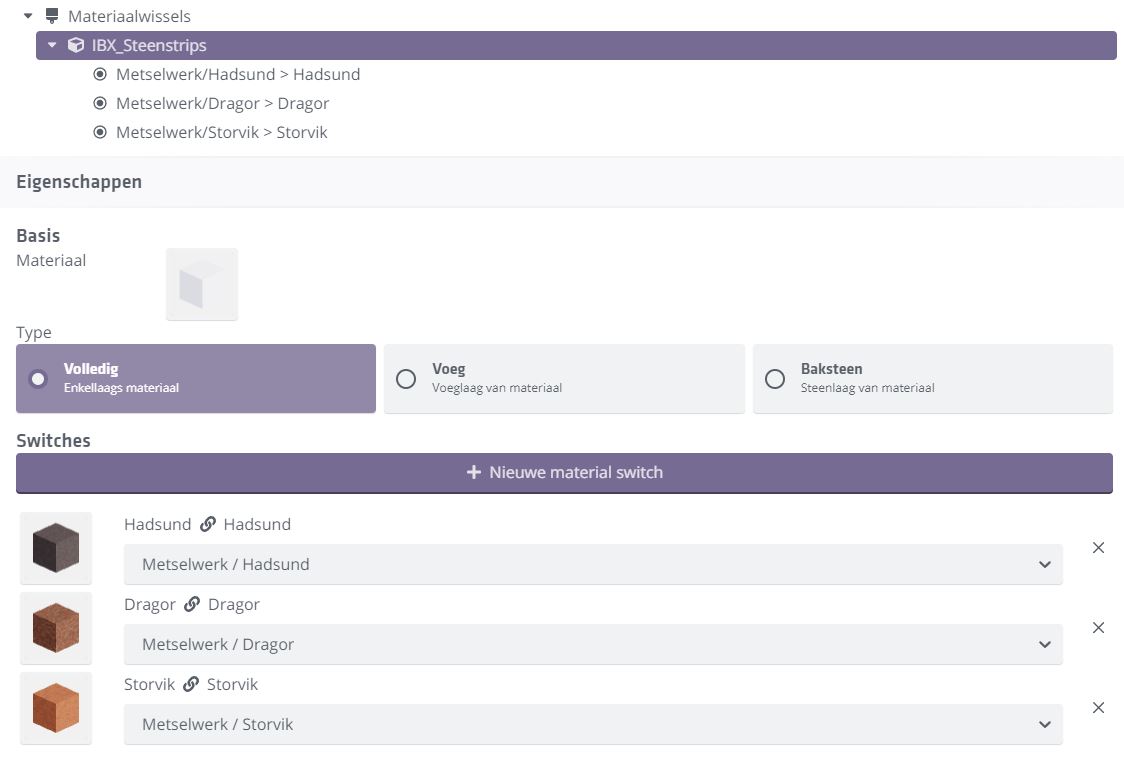
Drag the source material (
IBX_Steenstrips) from theMaterialspanel into the source material slot of the new material switch. -
Drag the new materials (Storvik, Dragor, and Hadsund) into the target material fields.
The result should look roughly like this.

It is also logical (though not required for this tutorial) to switch the roll layers based on the same options. You would set up another switch with its own source and target materials.